
How to track creator sales on Shopify: codes, links, pixel and order webhooks
How to track influencer sales on Shopify step by step: per-creator codes and links, a custom pixel, an on-page tag and signed order webhooks, read by tier.
To track influencer sales on Shopify, give every creator their own promo code and tracking link, add an on-page tag to your theme, add a custom pixel under Settings > Customer events so you can see the hosted checkout, and send signed order webhooks to your attribution tool. Then count each order once, at its strongest evidence, and report by confidence tier.
That is the whole method. The rest of this guide shows each step with the exact screens in Shopify and in cyrqle, a worked example of how to read the result, and the limits you should know before you start. It is written for brand and agency teams running creator campaigns on a Shopify store in Spain, the EU or Latin America.
If you are still choosing between codes, links and pixels, read what each attribution method sees and misses first. For the ROI maths that sits on top of the numbers you will collect here, see the guide to measuring influencer marketing ROI.
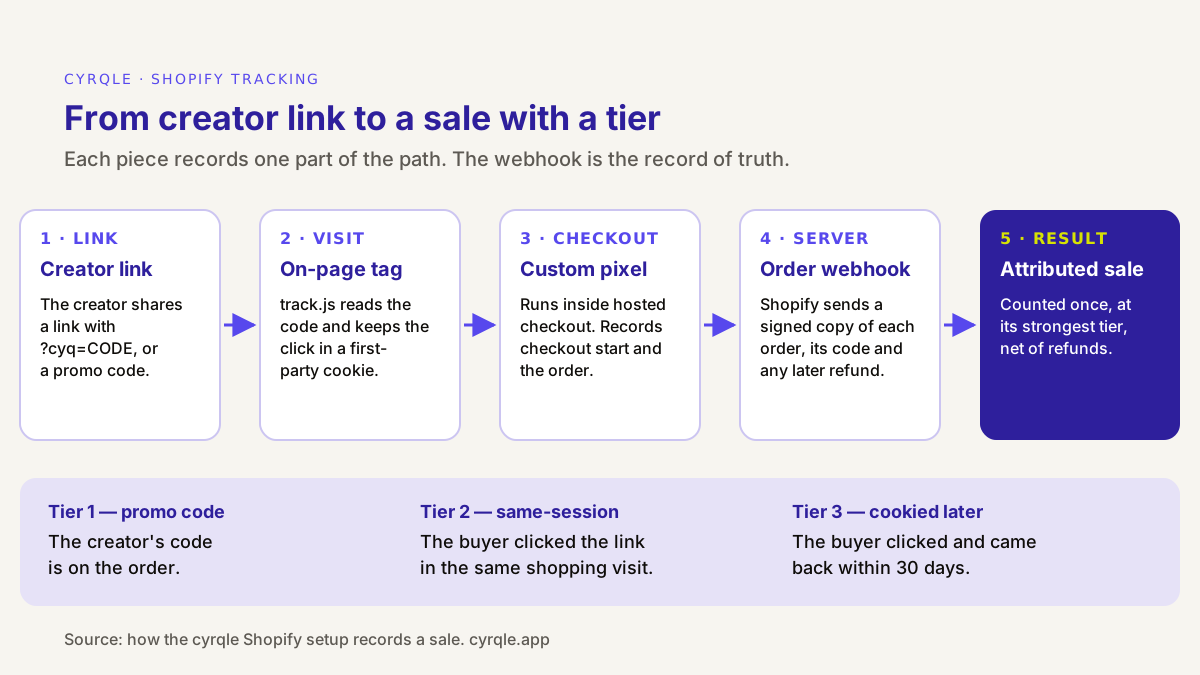
What does each tracking piece record on Shopify?
Each tracking piece answers one question, and no single piece answers all of them. A Shopify store needs all four because Shopify's checkout is hosted: scripts in your theme do not run on the checkout pages, so the click your theme saw has to be carried to the order by something that does.
| Piece | Where it runs | What it records | What it cannot do |
|---|---|---|---|
| Per-creator promo code | On the order | Which creator's code the buyer typed | See buyers who pay full price without the code |
Tracking link (?cyq= code) | In the creator's post, bio or story | Which creator sent the visit | Prove a purchase on its own |
On-page tag (track.js) | Your theme, on every storefront page | Page views and the click, kept in a first-party cookie on your domain | Run inside Shopify's hosted checkout |
| Custom pixel | Shopify Customer events, including checkout | Checkout start and the completed order, with the click it carries | Survive ad blockers or rejected consent, or record refunds |
| Order webhooks | Shopify's servers to yours | Every paid order, the codes on it, and refunds, signed with a secret | See browser context such as the session |
Shopify's own help centre confirms that custom pixels can collect events on the checkout and post-purchase pages, which theme scripts cannot reach (Shopify Help Center, custom pixels). The webhook matters because it comes from Shopify's servers, not from a browser that an ad blocker can stop.
Before you start
You need:
- A cyrqle brand or agency workspace, and a campaign with at least one creator who has accepted.
- Shopify admin access with permission to edit the theme, add a custom pixel and create webhooks.
- Your store's myshopify domain. Share it with the cyrqle team when you create the integration; cyrqle uses it to accept events from your store and to create discounts.
- A decision on consent. In Spain, storing or reading data on a visitor's device needs informed consent unless it is strictly necessary for the service (article 22.2 of the LSSI, Ley 34/2002). Decide with your privacy lead how the tag and pixel follow your cookie banner. This is not legal advice.
Allow about 30 minutes for the store setup and one test order. Codes and links for creators take minutes once the store is connected.
Step 1: Create the Shopify integration in cyrqle
- In cyrqle, open Settings, then Integrations, then Shopify.
- Click Create integration. This creates your Shopify integration record and shows a Webhook URL. Keep the page open.
- Under Storefront addresses, add every domain where your store runs, one per line (for example your custom domain). Only these sites may report clicks and orders for your workspace.
The integration page shows a Setup progress checklist and three counters: Page views (24h), Orders (24h) and Last webhook. Use them to check each step.
Step 2: Add the on-page tag to your theme
The on-page tag, track.js, reads the ?cyq= code on a creator's link and remembers the click in a first-party cookie on your own domain. It is under 2KB; why the attribution tag stays under 2KB explains the trade-off.
- In cyrqle, on the step Install track.js + Shopify Custom Pixel, copy the track.js snippet.
- In Shopify admin, go to Online Store, then Themes. On your live theme, open the menu and choose Edit code.
- Open
layout/theme.liquidand paste the snippet inside the<head>section. - Save.
Open your store in a private window. Within a couple of minutes, Page views (24h) in cyrqle should start to move.
Step 3: Add the custom pixel for Shopify checkout
A tracking pixel is how a click turns into a recorded order on a hosted checkout. On Shopify you add it as a custom pixel.
- In cyrqle, on the same step, copy the Custom Pixel code. It is a short loader with your workspace already filled in. Do not edit it.
- In Shopify admin, go to Settings, then Customer events, and add a custom pixel. Name it, for example, "cyrqle attribution".
- In the Customer privacy section, set Permission to match your consent decision from "Before you start". Shopify lets you choose Required (with the data purposes) or Not required (Shopify Help Center, manage custom pixels).
- Paste the code into the Code box, click Save, then Connect pixel.
The pixel records page views, add to cart, checkout start and the completed order. Because the loader pulls the current pixel from cyrqle, you never need to re-paste it after an update.
Step 4: Connect signed order webhooks
Order webhooks are the server-side record. They arrive even if the buyer's browser blocks the pixel or closes mid-checkout, and they carry refunds.
- In Shopify admin, go to Settings, then Notifications, then Webhooks, and click Create webhook.
- Create three webhooks, all in JSON format and on the latest API version, all pointing at the Webhook URL from Step 1: Order creation, Order payment and Refund create.
- On the same Shopify page, copy the signing secret ("All your webhooks will be signed with ...").
- Back in cyrqle, paste it into the platform secret field on the step Configure order webhooks and click Save platform secret. You can change it later under Maintenance.
Shopify signs every delivery with an HMAC signature, and its documentation says to verify that signature before trusting the payload (Shopify Dev, HTTPS webhooks). cyrqle rejects any delivery whose signature does not match. Shopify retries failed deliveries for a few hours, so if the secret was wrong, fix it the same day.
Step 5: Verify the chain end to end
- On the step Verify end-to-end with a test order, click Send test ping. cyrqle signs a sample order with your secret and sends it to your webhook URL. A pass reads "HMAC roundtrip ok".
- Take a real creator link from a campaign (see Step 7) and open it in a private window. Check that the address bar shows
?cyq=followed by the code. - Browse, add a product to the cart and place a test order.
- In cyrqle, check that Orders (24h) and Last webhook update. In Shopify, the webhook deliveries list should show a successful response.
When every step is done, the integration page shows "All set" and the store status reads Live.
Step 6 (optional): Let cyrqle create creator discounts
A minted promo code is only a label until a discount with the same name exists in Shopify. You can create each discount by hand in Shopify, or let cyrqle create them.
- You need an Admin API access token with the
write_discountsscope, from a custom app in your Shopify admin. - In cyrqle, open the Shopify integration and find Creator discounts.
- Paste the token into Admin API access token, set Percent off, and click Save.
From then on, every code cyrqle mints gets a matching basic discount in your store. It ends on the campaign's end date and can be used once per customer. cyrqle only creates discounts named after a code it minted and never edits or deletes anything else. Remove the token or clear the percentage to stop.
One Shopify change to know about: Shopify no longer lets merchants create new custom apps in the admin, although existing ones keep working (Shopify Dev, access tokens for admin-created custom apps). If you do not already have a custom app that can issue this token, create the discounts by hand in Shopify. Tracking works the same either way.
Step 7: Mint per-creator codes and links
In cyrqle, each creator gets a tracking link and a promo code automatically when they accept the campaign. You only mint by hand for special cases.
- Open the campaign and go to the Attribution tab.
- Click View links & codes to see every creator's links and codes with live click and redemption counts. Copy a value or export the list as CSV.
- To add a second placement, a late joiner, or a link tied to one post so its sales report separately, open Mint a link or code. Pick the creator, optionally set a landing URL (it defaults to your store's home page) and click Mint link or Mint code.
- To fill gaps across the roster, use Mint codes for everyone. Creators who already have a code are skipped.
If cyrqle created the discount in Step 6, the creator's brief also shows an auto-apply link. It opens your store with the code already applied and keeps the ?cyq= code on the visit, so you get the Tier 1 proof and the click data from the same buyer.
Two rules keep codes clean: one code per creator, never a shared campaign code, and an end date on every discount. Our post on code leakage and how to limit it covers the rest.
Step 8: Read the Attribution tab by tier
The campaign's Attribution tab is where the four pieces meet. It shows Attributed sales, attributed revenue, Total link clicks and the campaign ROAS at the top, then a Tier breakdown, Top creators, Top content, Top markets and a funnel from visitors to orders.
Each order counts once, at its strongest evidence:
| Tier | What it means | How strong |
|---|---|---|
| Tier 1 — promo code | The creator's code is on the order, read from the order webhook | Proof from the store, not an inference |
| Tier 2 — same-session | The buyer clicked the creator's link within about 30 minutes of the order | Strong, deterministic match |
| Tier 3 — cookied later | The buyer clicked the link and came back to buy within 30 days | Weaker, but still attributed |
The 30 days are the attribution window: a click older than that no longer earns credit. If the pixel records a Tier 2 or Tier 3 sale and the webhook then shows the creator's code on the same order, the sale moves up to Tier 1. It never moves down. Revenue is net of refunds, because the Refund create webhook writes a negative amount against the original sale.
For sales the store cannot see, such as a creator code redeemed at a shop till, click Log offline sale. The Record offline-attributed sale form needs a reason note, and the sale shows in the breakdown as recorded by an operator, so anyone reading the report can audit it.
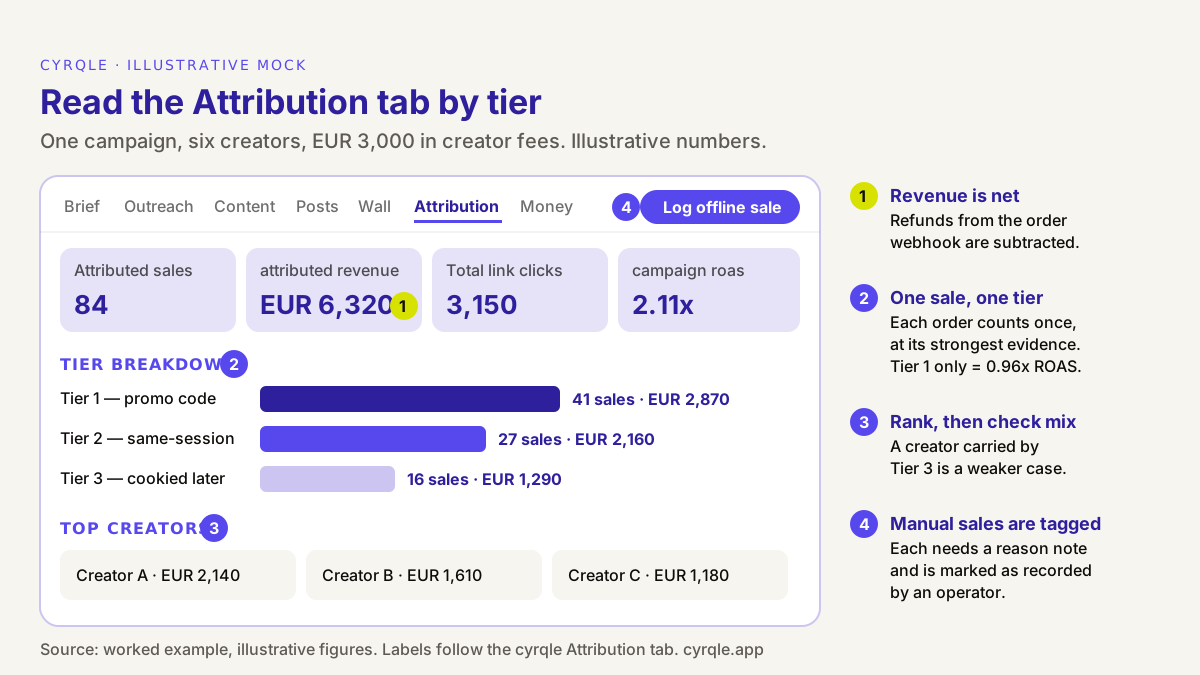
Worked example: one campaign, three ROAS figures
The numbers below are illustrative. A Shopify fashion brand runs a two-week campaign with six creators in Spain and pays EUR 3,000 in creator fees in total. After the campaign, the Attribution tab shows 84 attributed sales and EUR 6,320 in attributed revenue, net of refunds.
| View | Sales | Revenue | ROAS on creator fees |
|---|---|---|---|
| Tier 1 only (code on the order) | 41 | EUR 2,870 | 0.96x |
| Tier 1 + Tier 2 | 68 | EUR 5,030 | 1.68x |
| All tiers (1 + 2 + 3) | 84 | EUR 6,320 | 2.11x |
ROAS here is attributed revenue divided by creator fees, which is how the tab labels its basis. The three rows are the same campaign at three levels of evidence.
How to use them:
- Report all three. The single "2.11x" hides that more than half of the revenue (EUR 3,450 of EUR 6,320) rests on a click and a cookie. A finance reader will trust the range more than the headline.
- Use Tier 1 + 2 to decide renewals. It is the figure least affected by buyers who would have purchased anyway.
- Compare creators on their tier mix, not only their total. In the example, a creator with EUR 1,180 who is mostly Tier 1 is a stronger renewal case than one with the same revenue who is mostly Tier 3.
- State the window. Every number above assumes the 30-day window. Write it on the report.
None of these figures says whether the sales were caused by the campaign. Tiers measure how strong the link between a sale and a creator is, not incrementality. If you need that answer, run a holdout test outside the platform. The influencer ROI guide shows how to turn these numbers into ROI and contribution margin, and KPIs by campaign objective covers what to report when sales are not the goal.
What this setup does not do
Be clear about the limits before you promise a dashboard to anyone:
- No Shopify App Store app and no OAuth install. You connect the store by pasting the tag, the pixel and the webhook secret. There is no one-click install. The Shopify integration page lists what is included.
- No live catalogue sync. Products come into cyrqle from a Shopify CSV export, and you re-import when the catalogue changes. You only need products for shoppable content walls, not for sales tracking.
- Consent reduces link-based sales. Visitors who reject tracking cannot be tied to a click. Codes are not affected, because the code is on the order.
- Ad blockers stop the pixel, not the webhook. The order still arrives. It keeps its creator credit if it carries a code or if Shopify recorded the creator link as the landing page of that visit.
- No multi-touch, view-through or QR attribution. A sale goes to one creator at one tier.
- Marketplace sales are invisible. Orders on a marketplace you do not control never reach your Shopify webhooks.
Troubleshooting
- Page views stay at zero. Check that the
track.jssnippet is intheme.liquidand that your storefront domain is under Storefront addresses. Test in a browser without an ad blocker. - Orders stay at zero after a test sale. Check that the creator link still had
?cyq=when the store opened. Some link shorteners and redirects strip query parameters. - Webhook deliveries fail with 401. The signing secret in cyrqle does not match Shopify's. Copy it again from the Webhooks page and click Save platform secret.
- A creator's code does not work at checkout. The discount does not exist in Shopify yet. Create it by hand, or check the token and percentage under Creator discounts.
- The same buyer shows twice. This should not happen: the pixel and the webhook are matched on the Shopify order ID. Send the order number to support.
How cyrqle helps
Attribution in cyrqle is built around the setup in this guide. Per-creator promo codes and tracking links are minted when a creator accepts, and you can bulk-mint and export them. The on-page tag, the pre-filled Shopify custom pixel and signed order webhooks feed one record per order, with a confidence tier and an audit chain from the sale back to the post, code, creator and operator. On Shopify, cyrqle can also create the matching discounts if you paste an Admin API token.
The Attribution tab shows sales, revenue and clicks by tier, top creators, content and markets. For client-ready exports, use Reports. If you also want creator content on your store, the guide to embedding a content wall on Shopify uses the same integration. To see the tiers on your own store, book a 30-minute demo.
FAQ
Do I need a Shopify app to track influencer sales?
No. You need a promo code and a link per creator, a tag in your theme, a custom pixel under Customer events and order webhooks. cyrqle connects this way, with no App Store app and no OAuth install.
Is a discount code enough to track creator sales on Shopify?
It is enough for the strongest evidence, but it misses buyers who click and pay full price without the code. Add tracking links, the tag and the pixel to catch them, and count each order once at its strongest tier.
Why do I need webhooks if I already have a pixel?
The pixel runs in the buyer's browser, so ad blockers, consent choices and closed tabs can stop it. Webhooks come from Shopify's servers, include the codes used and report refunds. Use the pixel for the click and the webhook for the order.
How long does creator attribution last on Shopify?
In cyrqle, a click earns credit for 30 days. A purchase within about 30 minutes of the click is Tier 2, same-session; later purchases within 30 days are Tier 3. A promo code on the order is Tier 1 whenever it is used.
Are refunds removed from creator revenue?
Yes, if you connect the Refund create webhook. Each refund is written as a negative amount against the original sale, so attributed revenue is shown net of refunds.
Can I track creator sales in my physical shops?
Only with a code. Ask staff to note the creator's code at the till and record the sale with Log offline sale in the Attribution tab. Links and pixels cannot see a sale in a physical shop.
Sources
- Shopify Help Center, custom pixels: https://help.shopify.com/en/manual/promoting-marketing/pixels/custom-pixels
- Shopify Help Center, manage custom pixels: https://help.shopify.com/en/manual/promoting-marketing/pixels/custom-pixels/manage
- Shopify Dev, deliver webhooks through HTTPS (HMAC verification and retries): https://shopify.dev/docs/apps/build/webhooks/subscribe/https
- Shopify Dev, generate access tokens for admin-created custom apps: https://shopify.dev/docs/apps/build/authentication-authorization/access-tokens/generate-app-access-tokens-admin
- Ley 34/2002 (LSSI), article 22.2: https://www.boe.es/buscar/act.php?id=BOE-A-2002-13758
Related material.
A step-by-step guide to putting rights-cleared creator content on your Shopify store: importing products, building and tagging a wall, adding it to a page or product template, publishing, and connecting tracking.
Justify your influencer marketing budget on one page: spend, attributed revenue as a range, MER, payback, holdout result and risks, with a worked euro example.
A step-by-step guide to collecting customer and creator posts about your brand from Instagram and TikTok: choosing terms, picking a fetch mode, scheduling monitors with a budget cap, and reviewing the queue.